Candy Cane Cookie Cutters: Achieving Professional Results with Raised Imprint Designs
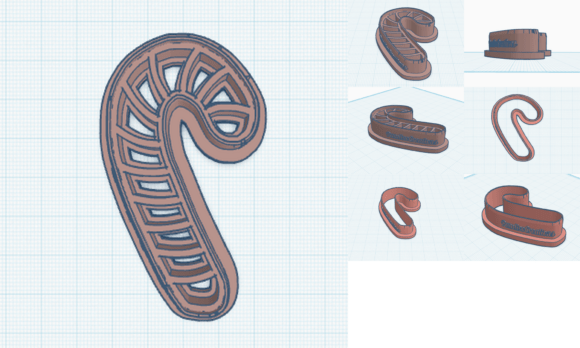
Baking festive holiday cookies is a cherished tradition, but achieving that professional bakery look at home often comes down to the tools you select. Candy cane cookie cutters featuring a detailed raised imprint have transformed seasonal baking by combining shape cutting and surface detailing into a single step. Unlike standard outline cutters that leave a blank canvas requiring extensive piping skills, these specialized tools press inner lines directly into the dough. This design element serves as a built-in guide for icing, making intricate decoration accessible for beginners while saving time for experienced decorators preparing large batches for holiday cookie boxes or bake sales.
However, not all cutters perform equally, and misunderstanding the specific requirements of 3D-printed PLA tools can lead to frustration. Many bakers mistakenly treat these precision instruments like traditional metal cutters, resulting in stuck dough, melted edges, or broken details. To get the most out of a candy cane cutter designed by makers like PamlicoCreations, it is essential to understand the material properties and proper techniques that distinguish high-quality results from disappointing bakes.
The Critical Difference Between Outline and Imprint Cutters
A common oversight when shopping for holiday baking supplies is assuming all plastic cutters function identically. Standard cutters only define the perimeter, leaving the decorator to freehand stripes and swirls. In contrast, a candy cane cookie cutter with a raised imprint creates physical grooves in the dough. These grooves are not merely decorative; they are functional guides that prevent royal icing from bleeding and help maintain uniform line width.
If you attempt to use an imprint cutter without adjusting your dough recipe or rolling technique, you may miss the benefit entirely. Dough that is too soft will not hold the impression, causing the raised details to puff up and disappear during baking. Conversely, dough that is too dry may crack under the pressure required to transfer the detail. The solution lies in using a recipe specifically formulated for cut-out cookies—typically one with low leavening agents and higher structural integrity—and chilling the dough thoroughly before cutting. This ensures the inner lines remain crisp and visible after baking, providing the perfect roadmap for your flood consistency icing.
Avoiding Heat Damage and Material Misconceptions
One of the most frequent mistakes that ruins 3D-printed cookie cutters is improper cleaning. Because these tools are typically made from PLA plastic with a 0.2 mm layer height, they have a lower heat tolerance than stainless steel or silicone. Placing them in a dishwasher or washing them in hot water can cause warping, delamination, or complete deformation. Even brief exposure to high temperatures can soften the reinforced walls and blunt the cutting edge, rendering the tool useless for future projects.
To preserve the longevity of your cutter, always hand wash using only cool or lukewarm water. Avoid soaking the cutter, as prolonged moisture exposure can sometimes affect layer adhesion over time. Dry the tool completely immediately after washing to prevent any potential bacterial growth in the layer lines. Understanding this care requirement upfront prevents the costly mistake of replacing warped cutters mid-season. Treat these as precision crafting instruments rather than heavy-duty kitchenware, and they will last through many holiday seasons.
Technique Adjustments for Clean Cuts and Sharp Details
Even with the best equipment, poor technique can compromise the final presentation. When using a 2.5-inch candy cane cutter, users often apply uneven pressure or twist the tool, which distorts the shape and smears the internal imprint. Twisting is particularly damaging with detailed cutters because it drags the raised features through the dough rather than pressing them cleanly.
For optimal results, press straight down with firm, even force to ensure the outer cutting edge penetrates fully and the inner detailing makes solid contact with the dough. Lift the cutter straight up without wiggling. If the dough sticks, lightly dust the cutter with cornstarch or powdered sugar rather than flour, which can alter the dough's hydration and fill in fine details. For crafters using polymer clay or fondant, this same principle applies: consistent vertical pressure yields the sharpest definition. Taking an extra moment to roll your dough to an even thickness also ensures the imprint depth is consistent across every cookie, which is vital for uniform baking and professional-looking sets.
Evaluating Size and Versatility for Your Needs
Before purchasing, verify that the approximate size meets your specific project goals. A 2.5-inch candy cane is ideal for standard cookie trays, gift boxes, and ornament-sized treats, but it may be too small for large display pieces or too large for delicate cupcake toppers. Beginners often overlook scale compatibility when assembling decorating kits or planning party favors. Measure your intended packaging or serving platters beforehand to avoid sizing mismatches.
Additionally, consider the versatility of the design. While marketed for Christmas cookies, the raised imprint style works exceptionally well with fondant sugar paste for cake accents and polymer clay for non-food crafts. The sturdy construction and solid base allow it to handle denser materials that might snap flimsier cutters. However, if you plan to switch between food and craft applications, designate separate cutters for each purpose to maintain food safety standards. Recognizing the multi-purpose nature of these tools maximizes their value beyond a single holiday season.
Making Informed Decisions for Holiday Baking Success
Selecting the right candy cane cookie cutter involves more than just liking the shape. It requires evaluating the manufacturing quality, understanding material limitations, and adapting your workflow to suit the tool’s strengths. Products designed and made by creators like PamlicoCreations often feature reinforced walls and solid bases specifically engineered to address common failure points in generic 3D-printed cutters. Checking for these structural details before buying can save you from dealing with fragile tools that break under normal baking pressure.
Ultimately, successful holiday baking combines the right equipment with informed technique. By respecting the care instructions, avoiding heat exposure, mastering the press-and-lift motion, and choosing the correct dough consistency, you transform a simple plastic tool into a gateway for professional-grade festive treats. Whether you are a small business owner fulfilling custom orders, a teacher leading a classroom activity, or a parent creating memories with children, understanding these nuances ensures your candy cane cookies look as delightful as they taste. Invest time in learning your tools, and your holiday baking will consistently reflect the care and precision that makes the season special.