Cute Dog Paw: A Practical Guide to Printing and Using This Decorative 3D Model
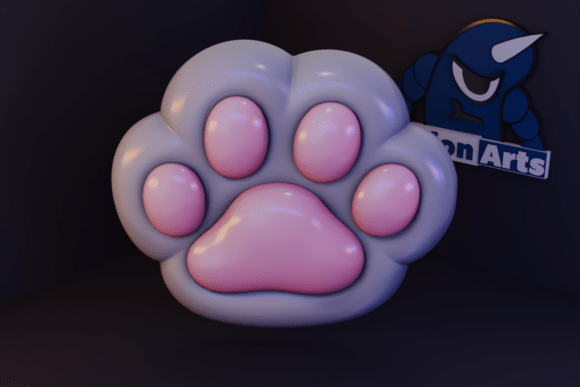
The Cute Dog Paw decorative 3D printing model has gained popularity among makers and pet enthusiasts for its deceptively simple charm. At first glance, it appears to be a straightforward print, but its minimalist design and rounded aesthetic serve a specific functional purpose that goes beyond mere decoration. This model features raised paw pads sculpted with smooth transitions and broad, well-defined surfaces rather than intricate, fragile details. For creators, entrepreneurs, and hobbyists, understanding the intentional geometry of this file is the difference between producing a generic plastic trinket and creating a professional-grade keepsake, keychain, or personalized gift.
Many users approach this model expecting a quick, support-free print due to its size, only to encounter adhesion issues or messy overhangs. Others underestimate the finishing process, assuming the "cute" factor comes straight from the nozzle. To get the most value from the Cute Dog Paw model, it is essential to align your printing strategy and post-processing expectations with the designer’s intent. This guide addresses common oversights and provides corrective advice to ensure your final product is durable, aesthetically pleasing, and suitable for its intended application.
Evaluating Printability and Support Requirements
A frequent misunderstanding involves the assumption that small, rounded objects are inherently easy to print without assistance. While the Cute Dog Paw is rated as a beginner-level model, the description explicitly notes that supports are required. Ignoring this specification is the most common cause of failed prints or poor surface quality on the raised pad elements.
The raised paw pads feature balanced depth designed for painting, but this same geometry creates overhangs that exceed standard bridging capabilities. Attempting to print without supports often results in sagging layers on the underside of the toe beans. When these imperfections occur on a smooth, minimalist surface, they become glaringly obvious and are nearly impossible to sand away without altering the intended shape. Instead of risking material waste, use tree supports or organic supports specifically targeted at the overhanging curves. These support types minimize contact points on the visible top surfaces, preserving the clean finish required for high-quality presentation.
Additionally, verify your bed adhesion strategy before starting. The model includes a flat base specifically engineered for stability, but this advantage is negated if the first layer is inconsistent. Because the footprint is relatively small compared to the height of the raised elements, a brim is often a safer choice than a raft. A brim increases the surface area touching the build plate without adding the difficult removal and scarring associated with rafts, ensuring the flat base remains truly flat for display or mounting.
Material Selection Beyond Standard PLA
While PLA is the default for most decorative prints, relying on it exclusively can limit the utility of the Cute Dog Paw model. If you are manufacturing keychains or items intended for daily handling, standard PLA may prove too brittle or susceptible to heat deformation in warm environments like cars or pockets.
Consider the end-use when selecting filament:
- PETG or ASA: Better choices for functional keychains or outdoor garden markers due to higher impact resistance and UV stability.
- Silk or Matte PLA: Ideal for decorative plaques where visual texture matters more than structural durability. Matte finishes specifically help hide layer lines on the broad surfaces.
- TPU (Flexible): An advanced option for pet tags or stress-relief items, though this requires significant adjustment to retraction settings and support interfaces.
Choosing the wrong material doesn't just affect longevity; it affects the perceived value. A glossy, scratched PLA keychain feels cheap, whereas a matte PETG version feels intentional and premium. Match the material properties to the customer or recipient's actual environment.
Optimizing Post-Processing and Finishing
The model’s design highlights—smooth transitions and balanced relief depth—are invitations for post-processing, not guarantees of a finished look. A critical mistake is treating this model as "print-and-done." The broad surfaces are designed to be sanded and painted, but skipping primer or using aggressive sanding grits can destroy the soft, friendly aesthetic.
Because the transitions between the main pad and the toes are smooth rather than sharp-edged, power sanding can easily flatten the curvature, making the paw look misshapen. Hand sanding with progressive grits (starting at 220 and moving to 400 or higher) preserves the organic flow. Furthermore, the balanced depth of the raised elements is specifically calibrated for techniques like dry brushing or wash application. Applying thick, opaque paint directly into the recesses fills in the detail work the designer included. Instead, apply a base coat, then use a dry brush to catch only the high points of the raised pads. This technique accentuates the 3D form and creates the professional contrast seen in product photos.
For those creating personalized items, such as custom pet memorials, consider the timing of personalization. Engraving or vinyl application should be planned before printing. The flat base offers an excellent canvas for laser engraving or adhesive labels, but applying these after painting can lead to alignment issues or adhesive failure on textured paint. Integrating text directly into the 3D file as a deboss (recessed) rather than an emboss (raised) often yields cleaner results for painting, as the paint naturally pools in the recesses during the washing phase.
Checking File Integrity and Licensing
Before committing to a print run for business or gifting, verify the source and license of the Cute Dog Paw file. Not all versions available online are identical; some may be remixed with thinner walls or altered proportions that compromise the "durable and easy-to-print" promise of the original design.
Always check the following before downloading or purchasing:
- Wall Thickness: Ensure the model maintains sufficient wall thickness for the raised pads. Remixed versions sometimes scale down aggressively, creating hollow areas that collapse under pressure.
- Commercial License: If you intend to sell keychains or keepsakes, confirm the designer permits commercial use. Assuming a free download allows resale is a legal risk that can harm your business reputation.
- Version History: Look for updates. Designers often refine models based on community feedback regarding supports or adhesion. Using an outdated v1.0 file might mean struggling with issues that were resolved in v1.2.
Aligning Expectations with Reality
The Cute Dog Paw model succeeds because it balances aesthetic appeal with manufacturing reality. It avoids overly thin details that plague many novice-designed pet models, making it accessible to beginners while remaining useful for professionals. However, accessibility does not mean automatic perfection.
Success with this model comes from respecting its specific design parameters: utilizing supports for the overhangs, selecting materials appropriate for the item's function, and investing time in finishing techniques that leverage the smooth transitions. By avoiding the rush to print and instead focusing on preparation and post-processing, you transform a simple digital file into a tangible, high-quality object that resonates with animal lovers. Whether you are an educator teaching basic modeling concepts, a small business owner expanding your product line, or a hobbyist making a gift, treating this model with technical respect ensures the final result is as charming in hand as it is on screen.