Mama Floral Shadow Box SVG: Crafting Tips for a Flawless 3D Display
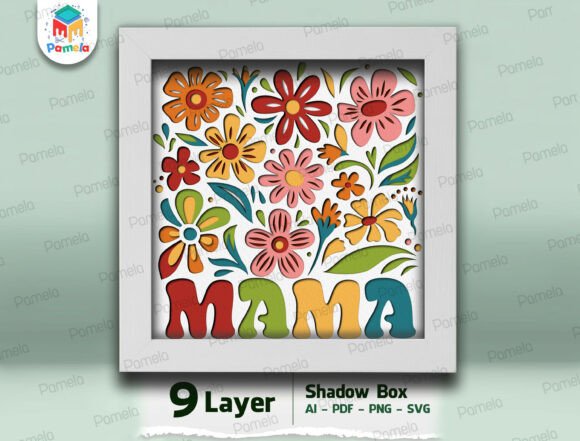
Creating a layered papercut project is one of the most rewarding experiences in digital crafting, and the Mama Floral Shadow Box SVG offers a particularly vibrant opportunity to celebrate motherhood. This design is not merely a collection of vector lines; it is a structured architectural piece composed of nine distinct layers that rely on precision and color theory to achieve its intended 3D depth. When executed correctly, the interplay between the "Mama" typography and the surrounding botanical elements creates a stunning visual effect that feels professional and heartfelt. However, many crafters find themselves frustrated when their final assembly looks flat or messy despite having high-quality files. The difference between a disappointing result and a gallery-worthy gift usually comes down to understanding the specific technical requirements of multi-layer shadow box designs before you even hit the cut button.
Understanding Layer Hierarchy Before Cutting
The most common mistake beginners make with the Mama Floral Shadow Box SVG is treating all nine layers as equal components rather than a stacked system. In a layered papercut, each file serves a specific structural or aesthetic purpose. Some layers are purely decorative floral accents, while others provide the essential spacing that creates the shadow effect. If you assemble these out of order or fail to distinguish between the background base and the foreground details, the depth will collapse.
Before cutting, open the SVG or AI file in your design software and visually separate the layers. Identify which layer contains the main "Mama" text and which layers serve as spacers. A practical approach is to color-code your digital workspace to match your physical paper stack. This prevents the costly error of cutting intricate floral details on cardstock that is too thick to fit inside the frame, or cutting structural spacers on paper that is too thin to support the weight of the layers above. Always verify the layer count against the product description; if your software shows fewer than nine distinct cut paths, you may have an import issue that needs resolving before wasting material.
Selecting Paper Weight for True Dimensional Depth
Paper choice dictates the success of any shadow box, yet many creators default to standard 65lb cardstock for every layer. While this weight is excellent for single-layer cards, it often fails in a nine-layer Mama Floral Shadow Box SVG project. Using uniform thickness throughout can result in a bulky final piece that does not fit in standard shadow box frames, or conversely, lacks the necessary rigidity to prevent sagging over time.
For optimal results, vary your paper weights based on the layer's function. Use heavier cardstock (80lb to 100lb) for the backplate and the primary "Mama" text layer to ensure structural integrity. For the intricate floral and leaf details, a lighter weight (65lb to 70lb) allows for cleaner cuts on fine botanical veins and reduces the overall stack height. This strategic variation maintains the 3D illusion without compromising the frame’s closure. Additionally, ensure your paper has a consistent core color. White-core cardstock is generally safer for layered projects because any accidental nicks or rough edges during weeding will be less visible than with dyed-core papers, keeping the finished piece looking pristine.
Avoiding Adhesive Mishaps in Botanical Details
The vibrant floral arrangement in this design features delicate leaves and petals that can easily be ruined by improper gluing. A frequent oversight is using liquid glue or hot glue on detailed papercut layers. Liquid adhesives cause paper to warp and buckle, destroying the crisp shadows that define this art form. Hot glue adds excessive bulk and can create uneven gaps between the nine layers, making the shadow box look amateurish.
Instead, utilize foam tape or silicone adhesive dots specifically designed for paper crafting. These adhesives serve a dual purpose: they bond the layers securely and act as built-in spacers to enhance the 3D effect. For the smallest floral elements where foam tape is too large, use a precision tip glue pen with a fast-tack, non-warping formula. Apply adhesive only to the center of small pieces to avoid squeeze-out. Taking the time to select the right adhesive ensures that the playful botanical elements remain flat and secure, preserving the clean lines that make the Mama Floral Shadow Box SVG so visually appealing.
Machine Settings and File Compatibility Checks
Even with perfect materials, incorrect machine settings can ruin intricate botanical cuts. Users of Cricut, Silhouette, Glowforge, or xTool machines must adjust their parameters for multi-layer projects. A setting that works for a simple vinyl decal will likely tear through delicate flower petals or leave uncut fibers on complex leaf veins. This leads to tedious manual trimming and potential damage to the design.
Always perform a test cut on a scrap piece of your chosen paper before committing to the full design. For laser users like Glowforge or xTool, ensure you are using the correct focus height for each paper thickness and adjusting power/speed settings to achieve clean edges without scorching. For blade machines, check that your blade is sharp and deep enough to cut through the specific cardstock weight without dragging. Since this design includes both bold typography and fine details, you may need to utilize a "multi-cut" feature or slow down the cutting speed to ensure accuracy. Verifying these settings upfront saves hours of frustration and preserves your premium materials.
Evaluating Digital Files for Commercial and Personal Use
When downloading the Mama Floral Shadow Box SVG, it is vital to understand what you are actually receiving. The inclusion of SVG, AI, PDF, and PNG formats offers versatility, but each serves a different user group. Beginners often download the PNG assuming it is a cut file, only to discover it is a raster image unsuitable for vector cutting machines. Conversely, professionals might overlook the PDF format, which is often preferred for laser engravers due to its precise scaling.
Before purchasing or downloading, confirm the licensing terms. If you plan to sell physical shadow boxes at craft fairs or online, ensure the license permits commercial use of the physical end product. Many designers restrict the resale of the digital file itself but allow unlimited physical sales. Clarifying this distinction protects your business from copyright issues. Also, verify that the files are organized logically. A well-structured download should have clearly labeled layers or a reference guide. If the files appear disorganized or lack layer names, contact the designer immediately. Proper file management is the foundation of an efficient workflow and ensures that your celebration of love and motherhood translates into a beautiful, stress-free creation.
Final Assembly and Framing Considerations
The final presentation of your Mama Floral Shadow Box SVG depends heavily on the frame you select. Not all shadow box frames are created equal, and assuming any deep frame will work is a risky assumption. Measure the total thickness of your assembled nine-layer stack before buying a frame. Standard shadow boxes typically offer 0.75 to 1 inch of depth. If your paper choices and adhesive spacers exceed this, the glass will press against the top layer, flattening the 3D effect and potentially damaging the artwork.
Consider using a frame with a removable backing for easier assembly. Secure the layered stack to the backing board rather than the glass to maintain consistent spacing. Finally, think about lighting. The beauty of this design lies in the shadows cast by the floral elements. Positioning the finished piece in an area with directional natural light or adding a small LED strip inside the frame can dramatically enhance the vibrancy and depth. By addressing these framing and display details, you ensure the handmade gift achieves the joyful, heartwarming impact intended by the designer.